Category Archives: Uncategorized

Who is ‘The ShuttleSmith’ (aka Karen Bovard Sayre)?

I have recently become enamored with Wordles.
 A Wordle is a visual depiction of words in a “word cloud” from text that you provide. It seems to be a great way to quickly understand the essence of a person in word-form. I got the idea after visiting a cemetery. Most of the tombstones that I saw had a descriptor such as ‘wife’, ‘mother’, ‘daughter’, etc. I got to thinking about what one or two words that I would want to represent me forever, actually ‘carved into stone’, and realized that there are sooooooo many more descriptors needed to adequately get an idea of who I am/was, as is true for everyone. So, I created this Wordle using descriptors/labels that represented my life. Since creating this, I decided to keep a list of attributes that I think represent me.

Karen Kay Reuter Bovard Sayre: TheShuttleSmith, Mother, Wife, Daughter, Sister, Aunt, Tatter, Sewer, Embroiderer, Fiber Artist, Lacemaker, Needlelacer, Motorcyclist, Sidecarist,
Motorcycle Safety Instructor, Dirt Biker, Trials Rider, Electron Microscopy Technologist, Neuropathology Technologist, 4-H Member, Smocker, Designer, Author, Publisher, Silversmith, Enamelist, Christian, Gardener, Teacher, Dana College Graduate, Lapidarist, Tatting Shuttle Maker, Nebraskan, Iowan, Farm Girl, One-Room Country School Student, Wisner-Pilger Gator, Baton Twirler, Piano/Guitar/Banjo/Mandolin Player, Farmer’s Daughter, Divorcee, Single Mother

I think that it is important to look at an individual as the sum of their parts. The above descriptors are the parts of my life, some more important to the whole than others, but still parts. I keep adding to the list as my life changes….but I never take away a descriptor.

It seems to me that a Wordle would be a great tombstone….I’m looking into this concept in the future.

‘Crackle’ Enamel Shuttles

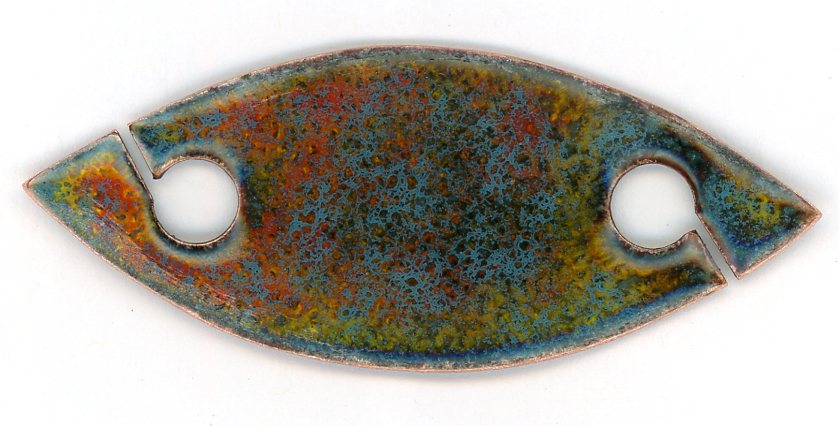
I have been trying for quite some time to create ‘crackle’ effect in my enameled shuttles. Just recently I have been able to achieve some success.

The technique of ‘enamel crackle’ is fickle. It’ more of an art than a science, but in actuality it’s relies on a lot of physics that really are not completely understood. Each color of enamel has different properties that may vary from batch to batch.

Getting crackles in your enamel depends on the use of at least two layers of different enamels which have different coefficients of expansion (COE)–told you physics was involved. The crackle effect is produced using a base coat of enamel with a very low coefficient of expansion (which means it flows/ moves readily sooner than other enamels would at the same temperature). After firing this ‘lower COE’ enamel, a top coat of usually two different colors of enamels with a slightly higher COE is applied and fired to a high temperature for a longer period of time. If the enameling-gods are with you, you will get a ‘crackle glaze’ look!

My 3 favorite colors in one piece-teal, orange & yellow. Actually the ‘orange’ started off as red but somehow changed appearance. There is a lot of chemistry & physics happening in enameling, especially in ‘Crackle Enamel’ pieces. (BTW, this piece is MINE!)

Watch for future posts of the crackle enamel tatting shuttles I have been producing. I will also be posting on my FB page: ShuttleSmithTatting

Comments to my posts–I need help!!

I USED to get and see comments to my posts. Now I don’t. I want this website to be interactive…not just what I post!!!!

So……how do I enable ‘comments’ on this my WordPress-generated website?

I swear that trying to figure out how to use social media is at least a part time job…time that I just don’t have right now.

If someone can help me (you can’t leave your suggestion in comments–hah!), please email me at: k.bovard@yahoo.om

Thread Color-Bleed

This is the red thread color-bleed that I encountered while trying to block my solid apple design.  Since this was one of 5 different designs in my ‘Spokane Beauty Apple‘ series, I was concerned about what would happen when I blocked other designs in which an area of white tatting was incorporated into a design with areas of red thread (as seen in the second photo).


L: First blocking water;   R: Second rinse of blocking water from the ‘Spokane Beauty Apple’.
The thread is Anchor Mercer Cordonnet. 
Top: Spokane Beauty Half Apple.
Bottom: Spokane Beauty Apple with Bite.
Karen Bovard Sayre Copyright 2019

Color-bleeding happens when fibers get wet and dye leaches out into the water.

In general, there are several reasons why color-bleed can happen:

  1. Incorrect dyeing techniques (ie. wrong dye type used for the type of fiber) or poor quality dyes were used.
  2. The dye was not properly rinsed out leaving an excess of unattached dye in the thread.
  3. The manufacturer did use a fixative or mordant to bind the dye to the thread/fiber.

Red dyes in general are not more prone to bleeding than similar dyes of other colors. The problem is that red-dyed fibers are often dyed with a kind of dye called ‘direct dye’.  Direct dye, whatever its color, tends to bleed in every wash, unless the fibers have been treated with a special cationic dye fixative. Using only cool water for washing will help, because higher temperatures decrease the ability of direct dye to remain associated with fabric.  Avoid direct dye, as well as all-purpose dye, which contains direct dye. Instead, use a fiber reactive dye.

  • Direct Dyes are a class of hot water dyes for use on cellulose fibers such as cotton.  It is one of two types of dyes that are mixed into ‘All-Purpose Dyes’.  (The other type of dye in All-Purpose Dyes is an ‘Acid Dye’–which will not stay in cellulose fibers for very long.)   Direct dyes are usually the cheapest forms of dyes.  The colors of most direct dyes tend to be duller that those colors obtained by fiber reactive dyes.  Expect anything dyed with direct dyes to ‘bleed’ forever. The color-bleed problem can be reduced by following direct dyeing with use of a cationic fixative/mordant after-treatment.
  • Fiber Reactive Dyes are the most permanent of all dye type.  Unlike other dye types, it forms a covalent bond with the cellulose (ie cotton, rayon, linen) or protein (ie. wool, silk) molecule.  Once the bond is formed you have one molecule.  The dye molecule has become an actual part of the cellulose fiber molecule.
  • All-Purpose Dyes are a mixture of Acid Dye (for dyeing animal/protein fibers such as wool as well as nylon) and Direct Dye (for dyeing cellulose fibers such as cotton, rayon, linen).  All-purpose dye cannot be used to dye polyester or acrylic.  It also cannot be used in cold water.
  • Acid Dyes are used to dye protein fibers such as wook, angora, cashmere, silk, the milk protein fiber called Silk Latte, the soy protein fiber called Soy Silk, & the synthetic polyamide fiber nylon.  Acid dyes are non-caustic and in some cases non-toxic (ie. food coloring dyes).  They are named for the mild acid (such as vinegar) used in the dyeing process and for the types of bonds they form to the fiber.
  • Vat Dyes are an ancient class of dye based upon the original natural dyes, Indigo and Tyrian Purple. Both cotton and wool as well as other fibers can be dyed with vat dyes. Vat dyes are difficult to work with.  They require a reducing agent to solubilize them. The dye is only soluble in tis reduced (oxygen-free) form.  The fiber is immersed repeatedly in an oxygen-free dyebath, then exposed to air (oxygen), whereupon the water-soluble reduced form of the dye changes color as oxygen turns it to the water-soluble form.  Indigo will change from yellow in the dyebath to green, then blue as the air hits it.
  • Cationic Dye Fixatives (aka ‘mordants‘) have a positive charge. The positive charge allows the fixative to cling to the negatively-charged dyes (such as those found in direct dyes, acid dyes, all-purpose dyes and even fiber reactive dyes).  They ‘swell’ dye molecules in the fibers so that they stick better.  They cannot stick to basic dyes which already have a positive charge.  Cationic dye fixatives help, if not fix, the problem of color bleed on improperly dyed fibers. There is some evidence though that cationic dye fixative may reduce the lightfastness of some dyes. This means that the color may fade faster by light than by laundering.  Do not wash fibers that have been treated in cationic dye fixatives in hot water.
    • Commonly used fixative/mordant agents are tannic acid, alum,  and salts of aluminum, chromium, copper, iron, iodine, potassium, sodium, tungsten & tin.
    • Vinegar and Salt are NOT dye fixatives.  Soaking in either will not set your dye.  At best it will just be another ‘wash’ which will help to remove some of your excess dye.
    • Look for a product called Retayne,  possibly found in quilt stores as a common cationic dye fixative.

For us as tatters, the why of color-bleed is really of no concern–the damage to the thread is done.  The issue is how can we control the color-bleeding?  How do we avoid color bleed from one area of a tatted piece into a different color region? (eg. My apple examples above.)

  1. Avoid use of hot water that can wash out the dye fixative/mordant.  If the fixative is washed out, it will no longer hold the dye to the fibers which will allow the release of dye from the fibers = color bleed.  Always use cool/cold water to block your tatting.
  2. If you suspect a color to potentially color bleed, then test it by soaking it in cool/cold water for a few minutes and see what happens.  If you end up with ‘colored’ water, you have a color-bleed problem.
  3. If you have a color-bleed problem you have two choices:
    1. Keep soaking the thread, various washes, until the color-bleed is not as intense/diminished.  (This is what I did with the red thread before tatting the multi-colored apple designs.  I had favorable results when I did block my apples, in cool/cold water.)
    2. Find a cationic dye fixative such as Retayne and use as directed. (I am just learning about this product as I write this article.)

Teneriffe Lace Loom Manufactured by/Prototype of The ShuttleSmith

First use of The ShuttleSmith Teneriffe Loom–work in progress. An additional thread is used to interact with the warp thread to create the foundation of the lace. Then the design is stitched (in progress).
 Close up of The ShuttleSmith prototype Teneriffe Loom created with a 3-D printer.

One of the ‘OTHER’ lace types that I study/teach/make is Teneriffe Lace. Another name for this lace type is Sol Lace. Sol is the Spanish word for ‘sun’. This is a good descriptive name because many of the traditional motifs are round & have radiating threads (warp threads) upon which a design is stitched with a needle. Thus it is a form of ‘needlelace’. To create the lace the warp threads are laid down in a overlapping, radiating fashion on some form of a ‘loom’. There are many forms of looms. In my Teneriffe Lace classes, we use a plastic canvas shape which is cheap and (usually) readily available (Hobby Lobby, Walmart). There are many different antique looms from the past. Some looms are more cumbersome to use because they entail having to use a needle to manipulate many (think several) yards of thread in dozens of maneuvers to lay down the warp threads, all the while hoping that you have enough thread cut from the ball to work continuously.

The loom that The ShuttleSmith is recreating is a unique loom in that the warp thread can be laid down continuously from the ball of thread source. This makes the warping step fast. Another benefit of this loom is that it is reusable. It is used by Brazilian lacemakers today. I found reference to this style of loom in an antique German publication/book.

So I tried to recreate this style of loom in plastic for myself by using a 3-D printer. I called upon my newly-graduated son (in mechanical engineering) to create ‘CAD’ programs for several sizes of Teneriffe Lace looms to my specifications. The following photos show my teneriffe loom design being 3-D printed for the first time at my local library. Most libraries today have a ‘maker space’ of some form, many with 3-D printers. I paid a nominal fee to have my prototype loom printed. It did take about an hour to print but was fascinating to watch.

The 3-D Printer–Note the thumbdrive in the computer monitor to the right. This is how I imported my loom design file to the 3-D printer program.
Early stage of 3-D printing my Teneriffe Lace loom
Mid-to-late stage of 3-D printing. Note the area to right is still showing a hollow matrix whereas the area to the left is starting to fill-in the outer side. The computer-aided-design program (CAD) creates a somewhat hollow piece to minimize the amount of material (plastic) needed.