Monthly Archives: October 2015

Padded Split Ring Tatting–Quilt-Inspired

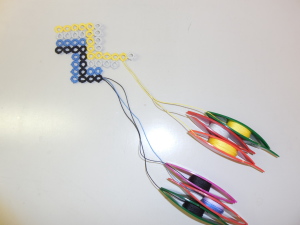
Here is a Quilt-Inspired Split Ring Tatting piece I have not posted yet.  The top photo shows the piece as a work-in-progress–it shows a bit about how the piece is worked.

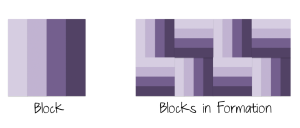
The middle picture is a diagram of how “Rail Fence” traditional quilt block works….it shows the individual quilt block and then how the quilt block looks/works when the basic design is repeated.

In traditional Split Ring Tatting Technique, the block would have to be make with each of the four colors as a separate ’round’ with only the darker color being ‘continuous’ from one block to another.  However with the addition of Padded Tatting Technique to Split Ring Tatting Technique, I can tat a fairly large round continuously.  It’s all about efficiency in tatting and minimizing/negating thread ends!

The top photo shows 2 rounds being tatted at the same time.

Each ’round’ requires 3 shuttles:  2 for the ‘base-color’ (yellow &  black)–Split Ring Tatting Technique; 1 shuttle for the ‘padded-color’ (grey & blue).
DSCN1470
‘Rail Fence’ in progress–working two rounds at the same time (3 shuttles per round)
traditional rail fence
Traditional “Rail Fence” Quilt Block Basics

Quilt 2

These are the two motifs that I used as the ‘challenge project’ at the recent 2015 IOLI Convention tatting class (Fun with Quilt-Inpired Split Ring Tatting) I taught.  Both motifs utilize both Padded Tatting Technique & Split Ring Tatting Technique simultaneouly.  The bottom motif shows “Rail Fence with several ‘repeats’ of the basic design element.

 

My tatting Bag–goes with me everywhere!

DSCN2478
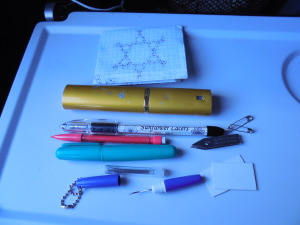
The ancillary tatting tools I keep in my tatting bag


DSCN2480
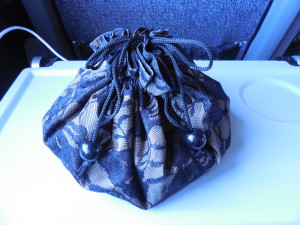
My tatting bag

DSCN2469

DSCN2473
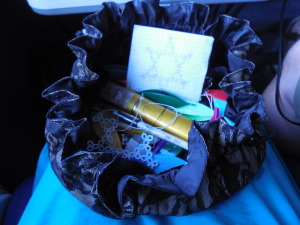
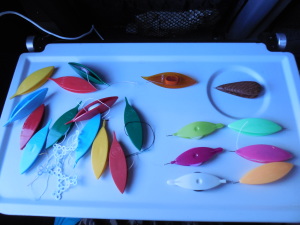
The shuttles in my tatting bag

I was on the Amtrak train 2 weeks ago heading from Omaha to Grand Junction for a long-weekend vacation when I decided to take inventory of what I had in my tatting bag.  I love those little round,  ‘jewelry-travel’ bags.  My personal favorites are the ones without a rigid base—they squish-down better to stuff into my purse.  I have this tatting bag in my purse and with me ALL THE TIME!  In fact, if it accidentally gets left at home, I sort of freak out.  It feels  like a major part of my life is missing.

In regards to my shuttles:  I use the Boye plastic fixed-center post shuttles.  These are the shuttles I could find growing up in the 70’s (yikes I’m giving away my age!!) in rural NE Nebraska.  Thus I got use to them:  their feel in my hand, the (larger) amount of thread they hold, the usefulness of the point, etc.  If you look close you can see my tatting-in-progress, a SRT snowflake of my own design.  The ‘aero-type’ shuttles (the 2 colorful ones are HH Aerlits) are only in my tatting bag to be used as crochet hooks.  I recently purchased the 3 HH Moonlit shuttles on the lower right.  They seem to have everything I like in a shuttle:  larger size (I have larger hands), same size as the Boyes; holds a decent amount of thread–probably more than my beloved Boyes; & a built-in hook—something I’ve never had before in a center-post shuttle.  Pictured is also a Clover shuttle (my secondary-favorite shuttle) and a NAG (Needle Arts Goddess) handmade wood shuttle.

In regards to my Ancillary Tools (top to bottom):  A paper copy of my current pattern; my reading glasses in a hard case (I’m old!); pen & mechanical pencil (to jot-down new pattern ideas & correct current patterns); Uncle Bill’s Tweezers (for the occasional opening-a-closed-ring problem); safety pins (for pinning my work in progress out of the way); scissor-snip in an enclosed case (God’s gift to my tatting!); an old perfume-sample glass vial, probably from the 60’s to house my size 24 tapestry needles that I use to sew-in ends; metal tooth-pick & sheath (my irreplaceable Split Ring Tatting tool to encourage tiny ‘joining-picots’ to be big enough to get a crochet hook into to create a join); 2 pieces of plastic (used to unwind/wind thread to create ‘continuous thread method’ between two shuttles–See previous post http://survivalarchitecture.com/shuttlesmithblog/continuous-thread-method-my-tip/ for my how-to.


Free Pattern for another Anne Orr Historical SRT Design

14 #11

After a long time away from this blog, I decided to send out another Anne Orr Illustrated Historical SRT Pattern.

This is what I call “#11” out of Anne Orr’s ‘Book #14’.

The pattern is on my website ‘page’ at:  http://survivalarchitecture.com/shuttlesmithblog/the-shuttlesmith-illustrated-historical-srt-patterns

I don’t know what happened to #10. I will have to look into this.

I Just checked and #10 is NOT a Split Ring Tatting Technique photo.  It is an ordinary tatting pattern–no split rings!  That is why I skipped it.  KB